
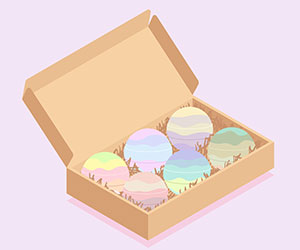
Bath bombs bring forth an exclusive experience, a blend of paint, fizz, and fragrance as you bathe and enjoy. Hands down, they are a wonderful delight, especially for children. Bath bombs great hydrotherapy with their herbal goodness, which explodes all around as your best handheld shower head fills up your bathtub with water, just like a volcanic eruption – but a soothing charm.
However, it is not wise to opt for any old bath bombs as they consist of agitating chemicals like linalool and limonene, leading to skin irritation problems. Some of them also contain plastics and glitter, which eventually drains into the ocean.
Apart from that, these bath bombs are also on the pricey end, often becoming a pain. Hence you can always opt for making these bath bombs at home.
Yes, you heard it right!
You can create these bath bombs on your own with just a few tools. You can customize them accordingly and opt for natural and organic ingredients. If you want to learn how to make bath bombs for kids, then keep reading on as we will talk about various DIY bath bomb recipes for you in this article.
Let us get creative, shall we?
How To Make Bath Bombs For Kids?
Ingredients
- 1 cup citric acid
- 2 cups baking soda
- 1/4 cup Epsom salt
- 1/4 cup cornstarch
- 10-15 drops essential oil (look out for allergic or skin reactions; optional)
- 1/4 cup coconut oil (You can also use alternative ones)
- Bath bombs molds (You can use different sizes also!)
- Water-soluble colorants (Do not use food colors to prevent tub staining; optional)
- Sprinkles (for kids; optional)
- Witch hazel in a spray bottle (non-compulsory)
Directions
Combine your dry ingredients well (Epsom salt, cornstarch, citric acid, and baking soda) in a large plastic bowl using a whisk tool.
Use a separate bowl to mix the wet ingredients. However, use a microwave to melt the coconut oil for 30 seconds completely. To the melted coconut oil, add essential oils and colorants.
Note: Coconut oil well binds your ingredients while keeping your skin super smooth and soft.
At a slow pace, mix the dry ingredients with wet ones and mix it well quickly. You can use a mixer for it. Add oils in bits to prevent them from causing any reactions. Use a Witch hazel multiple times in case your mixture seems dry. Analyze the moisture level by molding it into a ball shape and dropping it into a bowl without it being crumbled. Any frizz appearance means that you have overdone it.
You need to distribute the wet sand mixture into different bowls for multi-colored bath bombs to add your desired colors. Mix it well for even distribution of the colors.
Press the mixture into the bath bomb molds using your hands. You can add sprinkles too. Do not add additional pressure to tighten mold spaces.
Allow it to dry for a day or two, allowing them to loosen up. Use a metal spoon to tap it before you remove them.
Last but not least, add them to your water bathtub and enjoy it!
How To Make Bath Bombs Without Citric Acid?
Ingredients
- Silicone mold
- 1 cup baking soda
- 1/2 cup Epsom salt
- 1/2 cup cornstarch
- 1/4 cup cream of tartar
- 2 1/2 tbsp coconut oil
- 2 tsp essential oil
- 1 tbsp water (as required)
- 1-2 drops of food color (optional)
Directions
Step 1 – Mix the Dry Ingredients
Take a bowl and mix Epsom salt, tartar cream, baking soda, and cornstarch, using a whisk. Mix well. Use a glass bowl instead of a plastic one as it can interfere with most of the used wet ingredients.
Step 2 – Mix the Wet Ingredients
Use a separate glass bowl to combine the wet ingredients: essential oils, food coloring, coconut oil. Mix well. Food coloring may take a while to settle into the mixture.
Step 3 – Mix the Dry with Wet Ingredients
Mix the dry ingredients with the wet ones at a slow pace while continuously using a whisk to mix them. Make sure to get rid of all lumps and not rush into mixing ingredients quickly to prevent a chemical reaction.
Step 4 – Use Molds
Please give them a round shape using silicone molds instead of your using conventional methods as manual labor. Silicone molds make it easier to press them in and remove them quickly. Firmly press the mixture into the molds.
Step 5 – Remove them from Molds
Allow the mixture to set by placing it in the fridge. Once it appears solid and dry, remove from the molds. Next, allow it to settle down for another night.
Let The Fun Part Begin
Once ready, you can start using them or gift them to your relatives or friends, wrapped up in fancy paper.
Bath Bomb Recipe In Grams
To make your life easier, we have listed below the recipe for around 5 medium-sized bath bombs (100g). Let us look into it.
Dry Ingredients
- 100g citric acid
- 200g baking soda
- 100g salts (dead sea salts, sea salts, or Epsom salt)
- 100 g corn starch
Wet Ingredients
- 1 teaspoon per 5ml of essential oil (sweet orange)
- 5 tablespoon oil (you can use a variety of base oils, for example, sunflower, olive, rapeseed, or even sweet almond would do)
Directions
- Use separate bowls for wet and dry ingredients.
- Both bowls require thorough mixing using a whisk or a mixer.
- Slowly, mix both the solutions together while continuously mixing them. You can also use your hands to combine them.
- When the mixture becomes squishy and is seen to be sticking together, press them into molds. Do not wait long, or the mixture will become hard.
- Allow it to dry overnight.
- Remove from the molds.
- Use them for your baths.
Professional Bath Bomb Recipe
Ingredients
- 1 cup of baking soda
- ½ cup of citric acid (should not be GMO)
- ¼ cup of kaolin clay
- ¼ cup of fine grade Celtic sea salt
- 4 to 8 sprays of Isopropyl alcohol
- 1 tablespoon of rosehip seed oil
- 10 drops of essential oil (rose geranium)
- 12 drops of essential oil (lavender)
- 10 drops of essential oil (cedarwood atlas)
- 2 teaspoon of sunflower lecithin
- 1 tablespoon of colorant or rose hip extract (optional)
Essential Equipment
- Bath bomb molds
- Glass mixing bowl
- A spraying bottle for isopropyl alcohol
- Wire Whisk
Directions
- Use rosehip seed oil, rosehip colorant, lecithin, clay, sea salt, and baking soda while mixing them well in a glass bowl. Get rid of any clumps and focus on keeping a leveled consistency. Keep whisking till a pale pink color appears.
- Start adding portions of essential oils while simultaneously whisking the mixture.
- Add in citric acid and keep whisking.
- Add a few sprays of alcohol while subsequently whisking it. It prevents and fizzes reactions to form. (use alcohol in a well-ventilated area for sufficient breathing)
- Maintain consistency using alcohol to give it a fluffy damp sand texture.
- Use a mold to scoop in the mixture and press firmly.
- Give 10 to 15 minutes for the mixture to settle down. Use a spoon to check for its solid appearance.
- Remove the bath bombs from the mold if dry and ready.
- Use a baking sheet to allow the bath bombs to dry and solidify.
- Leave them overnight or 12 more hours besides.
- Once they are ready, you can use them.
Bath Bomb Recipe For Sensitive Skin
Ingredients
- 1/2 cup of Baking soda
- 1/4 cup of Arrowroot powder
- 1/8 cup of cream of tartar
- 6 tablespoon of Sunflower oil
- 10 drops of essential oil (Howwood)
- 20 drops of essential oil (Rose Geranium)
- 20 drops of essential oil (Rosewood)
- 1/8 cup of the pink Himalayan salt or sea salt Bath bomb mold
Directions
- Add wet and dry ingredients in separate bowls
- Mix them well to prevent any clumps
- Add essential oils in small quantities while thoroughly whisking the ingredients
- Slowly mix the wet ingredients with the dry ingredients
- Mix well to reach a damp sand appearance
- Pour and firmly press into molds
- Allow it to dry for 2 to 3 days
- Gently, unmold them once they are dry
- 6 small bath bombs are ready for use
DIY Dog Bath Bomb Recipe
Well, if you are looking forward to giving your pets a bath bomb delightful experience, then you are in for a treat as we have accumulated a DIY dog bath bomb recipe! Now, your fur buddy can enjoy a fun, relaxing treat.
Ingredients
- 1/2 cup of Baking Soda
- 1/4 cup of Cornstarch
- 1/4 cup of Epsom Salt
- 2-4 drops of Essential Oil
- 1 tablespoon of Vegetable or Coconut Oil
Directions
- Use separate bowls to mix dry and wet ingredients.
- Dry ingredients should be mixed thoroughly for the powders to be well incorporated.
- Mix both wet and dry ingredients slowly.
- Observe a crummy texture
- Transfer the mixture into molds and press firmly.
- Allow it to dry for a day or two.
- Please remove it from the molds.
- Bath Bombs are ready for your pets to use.
How To Make Bath Bombs Harder?
If you want to make your bath bombs harder, opt for using ingredients like cream of tartar and kaolin clay. Additionally, you can reduce the liquid amount incorporated in your recipe.
Lastly, you can also get rid of the moisture by resorting to airtight containers or silica gels.
How To Make Vegan Bath Bombs?
Making vegan bath bombs is relatively easy. You can find its ingredients at your home or any drugstore or grocery shop. Now, let us learn how to make vegan bath bombs.
Ingredients
- 100 g of baking soda (Natron)
- 35 g of cornstarch (Maisstarke)
- 50 g of citric acid (Zitronensaure)
- 15 ml of almond oil (Mandelol)
- Food colors (optional)
- Essential oils (optional)
- Non-pareils (optional)
Directions
Just follow these simple directions to create your very own vegan bath bombs.
- Mix all the given ingredients well.
- Do not rush while mixing. It can cause your bath bomb to break once it dries up. Slowly and carefully mix your ingredients.
- Transfer them into a mold and firmly press it in.
- Pack it extremely carefully ad thoroughly, or else it will crumble.
- Allow it to dry overnight.
- Remove them from molds.
- Vegan bath bombs are ready to use
Conclusion
Bath bombs are extremely fun with their fizzing and soothing effects. However, the scent might not be appealing for some people, or they may not be happy with its ingredients. Hence, you can always learn to homemade bath bombs that are easy to make and store.
Hopefully, the above article about how to make bath bombs for kids was informative enough to provide you with the appropriate recipes for your DIY bath bombs. You can now incorporate various colors, scents, and ingredients. Your kids would love it once you give it a try. All they need to do is, turn on their best shower head, fill up the tub and throw in those fancy bath bombs.
Not only this, they serve as delightful gifts for your friends too. You need to get your hands on the right supplies and begin your magical adventure. Since it is not just for your kids, you and your pets can also take advantage of it.
So what is all the wait about?
Please turn on your best high-pressure showerheads and let the enchantment unravel itself!

Leave a Reply