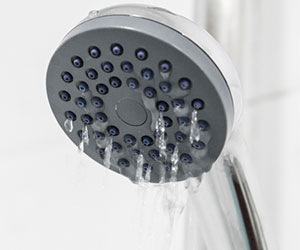
If you are dealing with inconsistent water pressure and flow in your shower head, clogging and deposition of debris may be the reason. Hence, it requires regular cleaning, just like all other household materials.
Although, often, people are unaware of how to clean shower head rubber nozzles, or they don’t bother to do it on their own. Neglecting the cleaning process can lead to a buildup of harmful bacteria and deteriorate your bathroom’s hygiene.
Tools You Need For Cleaning Shower Head Rubber Nozzles
If you plan on cleaning the shower head filters, then you should get ahold of a few necessary tools.
Get your hands on these materials beforehand, so that you avoid any last-minute shopping hassles.
Cleaning A Shower Head Without Removing It
If you want to remove all the debris and deposit without the removal of your shower head, then follow these simple steps. You will get a clean showerhead in no time.
Step 1: Fill A Bag With Vinegar
Using vinegar to soak the showerhead is a remarkable yet natural remedy to clean your showerhead thoroughly. It also removes all the settled debris and junk.
To ensure the tightness of your water pipe, tie a rubber band on the shower head’s arm with a loop or two. Take a plastic bag and fill it halfway through with vinegar. Now attach this bag, under the looped rubber band, on your shower head.
Step 2: Wait & Rinse
Leave it for an hour or two and remove the plastic-filled bag. Rinse off using hot water that runs through the showerhead.
Cleaning A Shower Head After Removing It
If the mineral deposits are embedded deep within, and vinegar is not doing the trick, then you will have to remove the showerhead. This will allow you a thorough cleaning process.
Step 1: Remove The Shower Head
You can disconnect your shower head by unscrewing the shower arm’s nut using a wrench. Take precautions to prevent any damage. Use a rag for cushioning your tools to avoid any permanent scratches.
Step 2: Rinse with Water
Rinse your shower head with water thoroughly. Turn it upside down while placing it under a faucet with hot running water. This will clear off all the debris through the opening of the shower arm connection.
If any residue is still left behind, then use vinegar and an old toothbrush to clean it off.
Step 3: Clean & Dismantle The Shower Head
For any additional leftover deposits, you can use a safety pin or a toothpick for their removal.
Step 4: Soak Overnight in Vinegar
For any remaining deposits of limescale, dip the showerhead in a vinegar solution. You can add a small amount so baking soda (a few tablespoons) for deeper cleaning.
Leave the solution overnight as your shower head is immersed in it. This will remove all clogging. Now use water to rinse your showerhead again.
Step 5: Clean The Rubber Nozzles
A few simple steps are required for this procedure. Many times, you will find shower heads that come with rubber nozzles, from where the water exits.
You can simply use a toothbrush or your finger to gently rub along the nozzles of your best handheld shower head. This will loosen all deposits and debris. Next, you can run warm water through it for the next few minutes.
Step 6: Clean the Filter Screen
Your shower heads also consist of a filter screen, which can experience a buildup of dust and debris. You can look for a manual for your shower head, in case it has a filter, and disassemble it accordingly.
Now use a brush to clean the screen. Rinse with hot water. Do not make use of soap as it can cause damage to your shower head’s filter screen.
Step7: Reattach & Reinstall
Seal the shower arm using plumbing tape. And Reassemble the shower arm and the showerhead using a wrench tool. Use rags for cushioning.
How to Prevent Future Clogs?
To unclog your pipes and drain, you can always use a plunger to clean it. Make sure that you remove your shower head’s cover and clear away all blockages.
If you don’t find it helpful, then you can use a chemical drain cleaner.
Check for the length of the blockage before you initiate the cleaning process. Deep cleaning is not a necessity if the holes seem clear, and water is yet flowing out through the nozzle.
Although, if you witness a restricted water flow, then you can opt for deep cleaning as a severe buildup must be blocking the passage.
If all else fails, you then have to remove the shower arm separating it from the showerhead. Avoid using any tools as they can scratch your material. Opt for a non-removal strategy if your shower head is made up of stainless steel, metal, or chrome.
Tips For Cleaning Shower Head
If you don’t know how to clean a shower head with baking soda or how to clean a shower head with bleach, then we have the ultimate solution for you.
Listed below are a few shower head cleaning hacks, as you clean your shower head. Hopefully, these will help you in having a smooth cleaning experience.
- Try not to use any bleaching solutions for the cleaning of your shower head. This is so as it can cause an increase in the harmful bacteria that resides in your shower head due to the chlorine beach properties. Additionally, it can ruin your clothes and is a caustic agent. Hence, it is best to avoid it.
- Avoid using any hard-bristle brushes. This can lead to permanent scratches if your shower head is made of chrome, metal, or stainless steel.
- Work in a well-ventilated environment because of the strong fumes that you are working with. For instance, vinegar can cause a reaction, being a commercial cleaning product. So make sure you receive ample ventilation.
- You can always use the leftover vinegar for polishing your shower head to give it a new yet refreshing outlook.
Conclusion
You need to clean your shower heads once every month to minimize bacterial growth, maintain steady water pressure, and clean your bathroom.
Hopefully, our guide provided you with a more in-depth insight into how to clean shower head rubber nozzles without any hassle or additional expenses.
Make sure to try these tips and tricks to give your bathrooms a new look! 🙂


Leave a Reply